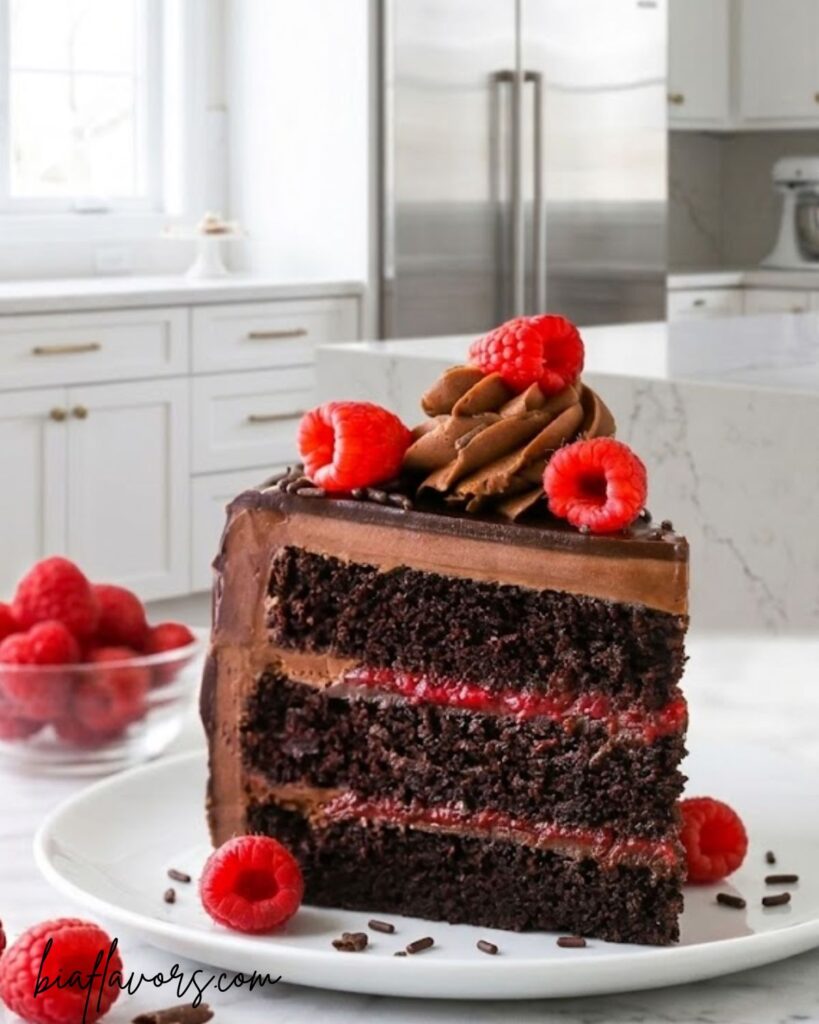
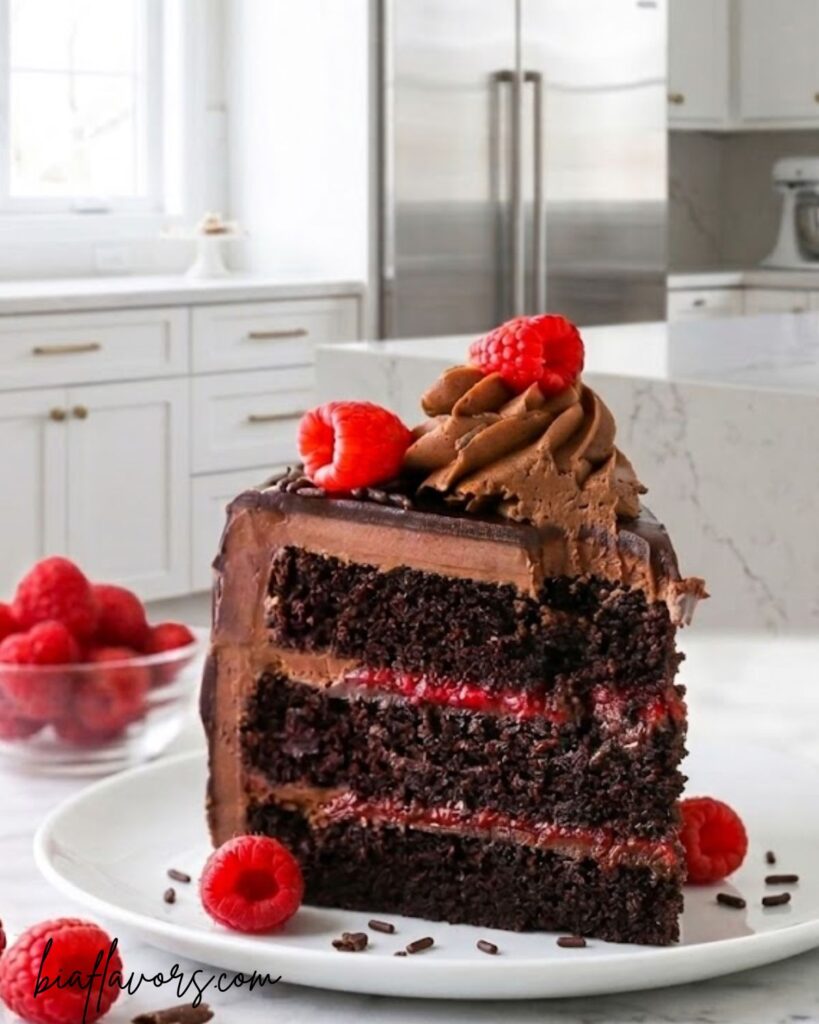
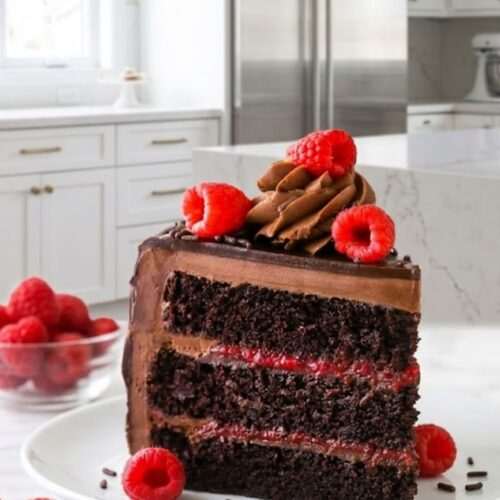
One bite of this chocolate raspberry layer cake, and you’ll understand why this flavor combination is so loved. Honestly, the rich, moist chocolate layers paired with a bright, tangy raspberry filling create a perfect balance that feels both indulgent and refreshing at the same time. It’s the kind of dessert that instantly impresses, whether you’re serving it at a celebration or simply treating yourself.
What makes this cake even more special is how every layer works together beautifully. The deep chocolate flavor melts in your mouth, while the raspberry adds a fresh burst that keeps each bite exciting. Trust me, once you make this, it will quickly become one of your favorite go-to cakes for special occasions.
Why We Love This Recipe
This cake is a perfect example of how two bold flavors can come together and create something truly special. The richness of the chocolate layers pairs beautifully with the slightly tart raspberry filling, which helps balance the sweetness and keeps the cake from feeling too heavy. That’s why every bite feels smooth, fresh, and satisfying at the same time.
Another reason to love this recipe is its versatility. It works wonderfully for birthdays, celebrations, or even a weekend treat when you want something a little more indulgent. Honestly, it’s the kind of dessert that looks elegant on the outside but is simple and rewarding to make at home.
Ingredients You’ll Need For Chocolate Raspberry Layer Cake
Raspberry Filling
- Granulated sugar – helps sweeten and balance the tartness of raspberries
- Cornstarch – thickens the filling to give it a smooth, jam-like consistency
- Water – helps dissolve the sugar and activate the cornstarch
- Fresh raspberries – provide natural fruity flavor and a slightly tangy taste
For the Chocolate Cake
- All-purpose flour – gives structure to the cake
- Granulated sugar – adds sweetness and helps create a soft texture
- Unsweetened cocoa powder – provides rich chocolate flavor
- Baking soda – helps the cake rise and stay light
- Baking powder – adds extra lift for a soft crumb
- Salt – enhances the overall flavor
- Milk – adds moisture and richness
- Vegetable oil – keeps the cake moist and soft
- Vanilla extract – adds depth and enhances flavor
- Eggs – help bind the ingredients and give structure
- Hot water – helps bloom the cocoa powder for a deeper chocolate taste
For the Chocolate Frosting
- Unsalted butter (room temperature) – forms the creamy base of the frosting
- Semi-sweet chocolate chips (melted) – adds rich chocolate flavor and smooth texture
- Dark cocoa powder – intensifies the chocolate taste
- Powdered sugar – sweetens and thickens the frosting
- Salt – balances sweetness and enhances flavor
- Heavy whipping cream – creates a smooth, fluffy, and spreadable consistency
For the Chocolate Ganache
- Semi-sweet chocolate chips – creates a rich and glossy chocolate layer
- Heavy whipping cream – makes the ganache smooth and pourable for drips and filling
How to Make Chocolate Raspberry Layer Cake
1. Prepare the Raspberry Filling
Start by combining sugar, cornstarch, and water in a saucepan over medium heat. Stir until the mixture begins to warm and the sugar dissolves. Add the raspberries and gently stir to coat them in the mixture. As it cooks, the raspberries will soften and release their juices—use a spatula to mash them slightly for a smoother filling.
Continue cooking for about 5 minutes until the mixture thickens and looks glossy. Once ready, remove it from the heat. You can strain it if you prefer a seedless filling, then transfer it to a bowl and let it cool completely in the refrigerator. This step is important because a cooled filling helps the cake layers stay neat and stable.
2. Prepare the Cake Batter
Preheat your oven to 350°F (176°C) and prepare three 8-inch cake pans by greasing them and lining the bottoms with parchment paper. In a large bowl, mix together flour, sugar, cocoa powder, baking soda, baking powder, and salt until well combined.
In a separate bowl, whisk together milk, oil, vanilla extract, and eggs. Pour the wet ingredients into the dry ingredients and mix until smooth. The batter will start to come together nicely at this stage.
Now slowly add the hot water while mixing on low speed. This helps create a thin batter, which is completely normal and actually gives the cake its soft and moist texture. Scrape down the sides of the bowl to make sure everything is fully combined.
3. Bake the Cake Layers
Divide the batter evenly between the prepared cake pans. Bake for 22–25 minutes, or until a toothpick inserted in the center comes out with a few moist crumbs. Avoid overbaking, as it can make the cake dry.
Once baked, let the cakes cool in the pans for 2–3 minutes, then carefully remove them and place them on a wire rack to cool completely.
4. Make the Chocolate Frosting
In a large bowl, beat the softened butter until smooth and creamy. Add the melted chocolate in batches, mixing well after each addition. Then add cocoa powder and mix until fully incorporated.
Gradually add powdered sugar, salt, and half of the heavy cream. Mix until smooth, then add the remaining powdered sugar and cream as needed until you reach a fluffy, spreadable consistency. This frosting should be rich, smooth, and easy to spread.
5. Prepare the Chocolate Ganache
Place the chocolate chips in a bowl. Heat the heavy cream until it just begins to boil, then pour it over the chocolate. Let it sit for 2–3 minutes so the chocolate softens, then whisk until smooth and glossy. Set it aside to cool slightly it should be pourable but not too hot.
6. Assemble the Cake
Once the cakes are completely cool, level the tops using a serrated knife if needed. Place the first layer on your serving plate and pipe a frosting border around the edge to create a dam.
Spread a layer of ganache in the center, then spoon the raspberry filling over it and spread evenly. Add the second cake layer and repeat the same steps. Place the final cake layer on top.
7. Frost & Decorate
Frost the top and sides of the cake with the remaining chocolate frosting, smoothing it out as desired. Drizzle the ganache around the edges to create a drip effect, then pour some over the center for a glossy finish.
Pipe decorative swirls on top with the remaining frosting and add fresh raspberries or chocolate sprinkles if you like. This makes the cake look extra beautiful and bakery-style.
8. Chill & Serve
Refrigerate the cake until ready to serve. Before serving, let it come to room temperature for the best texture and flavor. Honestly, this step makes a big difference in taste and softness.
Expert Tips For the Perfect Chocolate Raspberry Layer Cake
Use Room Temperature Ingredients
Make sure your eggs, milk, and butter are at room temperature. Honestly, this helps everything mix smoothly and creates a better cake texture without lumps.
Don’t Skip Leveling the Cake
Leveling the cake layers gives you a stable and professional-looking cake. It also helps the layers sit evenly, so your filling and frosting don’t slide.
Chill the Cake Layers
If your cake layers feel soft, you can chill them slightly before assembling. This makes them easier to handle and prevents crumbling while stacking.
Control the Raspberry Filling Thickness
If your raspberry filling is too runny, cook it a little longer. If it’s too thick, add a small amount of water. The goal is a spreadable consistency that stays in place.
Use a Piping Dam
Piping a frosting border (dam) around the cake layers is very important. It keeps the raspberry filling from leaking out and helps maintain clean layers.
Let Ganache Cool Slightly
Don’t pour very hot ganache on the cake. Let it cool slightly so it drips nicely instead of running too quickly. Trust me, this makes the drip effect look much better.
Don’t Overmix the Batter
Mix just until everything is combined. Overmixing can make the cake dense instead of soft and moist, which you definitely want to avoid.
Fun Ways to Customize This Cake
Try Different Fruits
You can easily replace raspberries with strawberries, cherries, or even mixed berries. Honestly, each fruit brings its own unique flavor, but all of them pair beautifully with chocolate.
Add a Chocolate Twist
For extra richness, you can add chocolate chunks or chips into the cake batter. This makes every bite even more indulgent and chocolatey.
Make It Less Sweet
If you prefer a less sweet cake, reduce the sugar slightly in the frosting or use dark chocolate instead of semi-sweet. Trust me, it still tastes amazing with a more balanced flavor.
Use Different Frosting
Instead of chocolate frosting, you can try vanilla buttercream or even whipped cream. This gives the cake a lighter taste and lets the raspberry flavor stand out more.
Turn It Into Cupcakes
You can also turn this recipe into cupcakes by adjusting the baking time to around 18–22 minutes. It’s a great option for parties or portion control.
Add a Flavor Boost
You can add a hint of espresso powder to the chocolate cake batter. It won’t taste like coffee, but it will enhance the chocolate flavor beautifully.
Storage Tips
Keep It Covered
Store the cake in an airtight container or wrap it well with plastic wrap. This simple step helps keep the cake soft, moist, and prevents it from drying out.
Refrigerate the Cake
Because of the raspberry filling and frosting, it’s best to keep this cake in the fridge. It will stay fresh for about 4–5 days when properly stored.
Let It Come to Room Temperature
Before serving, take the cake out of the fridge and let it sit for 30–45 minutes. Trust me, this makes a big difference the texture becomes softer and the flavors taste much better.
Freezing Option
If you want to store it for longer, you can freeze the cake. Just wrap it tightly in plastic wrap and then in foil. It can stay in the freezer for up to 2 months.
Freeze in Slices
For convenience, you can slice the cake before freezing. This way, you can take out just one slice whenever you’re craving something sweet.
Don’t Leave It Open
Try not to leave the cake uncovered for too long. It can dry out quickly, so always keep it well wrapped to maintain that fresh, bakery-style taste.
More Cake Recipes
- Reese’s Peanut Butter Cookie Cake
- Peanut Butter Truffle Chocolate Cake
- Hawaiian Carrot Pineapple Cake
- Chocolate Cake
- Brown Butter Carrot Cake
FAQs About These Chocolate Raspberry Layer Cake
Can I use frozen raspberries instead of fresh?
Yes, you can use frozen raspberries. Just cook them straight from frozen—no need to thaw. Honestly, frozen berries work just as well, but you may need to cook the filling a little longer to get the right thickness.
Why is my cake dry?
This usually happens if the cake is overbaked or the batter was overmixed. Trust me, baking just until a toothpick comes out with a few moist crumbs and mixing gently can make a big difference.
Can I make this cake ahead of time?
Yes, this cake is perfect for making ahead. You can bake the layers a day in advance and store them wrapped in the fridge. In fact, the flavors often taste even better the next day.
Can I skip the raspberry filling?
You can, but the raspberry filling adds a nice balance to the rich chocolate. Without it, the cake will be more on the sweet and heavy side.
How do I get clean cake slices?
For neat slices, use a sharp knife and wipe it clean after each cut. Also, make sure the cake is slightly chilled before slicing—it helps the layers stay neat and tidy.
Can I use a different frosting?
Yes, you can switch to vanilla buttercream or whipped cream if you prefer a lighter taste. However, chocolate frosting pairs beautifully with the raspberry flavor.
Final Thoughts
This chocolate raspberry layer cake is one of those desserts that feels special from the very first bite. The rich, soft chocolate layers combined with the fresh raspberry filling create a balance that’s both indulgent and refreshing. Honestly, it’s the kind of cake that never fails to impress, whether you’re making it for a celebration or just to treat yourself.
What I really love about this recipe is how it brings everything together in such a beautiful way the texture, the flavor, and even the presentation. Trust me, once you make it, it will quickly become one of your favorite go-to cakes for any occasion.
Chocolate Raspberry Layer Cake
Ingredients
For the Raspberry Filling
- 1/4 cup 52g granulated sugar
- 1 tbsp cornstarch
- 2 tsp water
- 2 cups 225g raspberries
For the Chocolate Cake
- 1 3/4 cups 228g all-purpose flour
- 2 cups 414g granulated sugar
- 3/4 cup 85g unsweetened cocoa powder
- 2 1/4 tsp baking soda
- 1/2 tsp baking powder
- 1 tsp salt
- 1 cup 240ml milk
- 1/2 cup 120ml vegetable oil
- 1 1/2 tsp vanilla extract
- 2 large eggs
- 1 cup 240ml hot water
For the Chocolate Frosting
- 1 1/2 cups 336g unsalted butter (room temperature)
- 2 cups 338g semi-sweet chocolate chips (melted)
- 5 tbsp 35g cocoa powder
- 6 cups 690g powdered sugar
- 1/2 tsp salt
- 10 –12 tbsp 150–180ml heavy cream
For the Chocolate Ganache
- 1 1/2 cups 254g semi-sweet chocolate chips
- 3/4 cup heavy cream
Instructions
- Start by making the raspberry filling. In a saucepan, combine sugar, cornstarch, and water over medium heat. Stir until the sugar begins to dissolve.
- Add raspberries and cook until they soften and release their juices. Mash gently as they cook.
- Once thickened (about 5 minutes), remove from heat. Let it cool completely. You can strain it if you prefer a smooth filling.
- Preheat oven to 350°F (176°C). Prepare three 8-inch cake pans with parchment paper and grease them well.
- In a large bowl, mix flour, sugar, cocoa powder, baking soda, baking powder, and salt.
- In another bowl, combine milk, oil, vanilla, and eggs. Add this to the dry ingredients and mix until smooth.
- Slowly pour in hot water and mix until the batter is thin and fully combined.
- Divide the batter evenly into pans and bake for 22–25 minutes, or until a toothpick comes out with a few moist crumbs.
- Let the cakes cool completely before assembling.
- To make the frosting, beat butter until smooth. Add melted chocolate, cocoa powder, powdered sugar, salt, and cream. Mix until fluffy and spreadable.
- For ganache, heat the cream until hot (not boiling), pour over chocolate chips, let sit for 2–3 minutes, then whisk until smooth.
- Assemble the cake by layering cake, frosting dam, ganache, and raspberry filling. Repeat layers and finish with frosting on top and sides.
- Drizzle ganache over the top and decorate with frosting swirls and raspberries.
- Chill before serving and enjoy!