Apple Bread Pudding Recipe (Old-Fashioned & So Cozy)
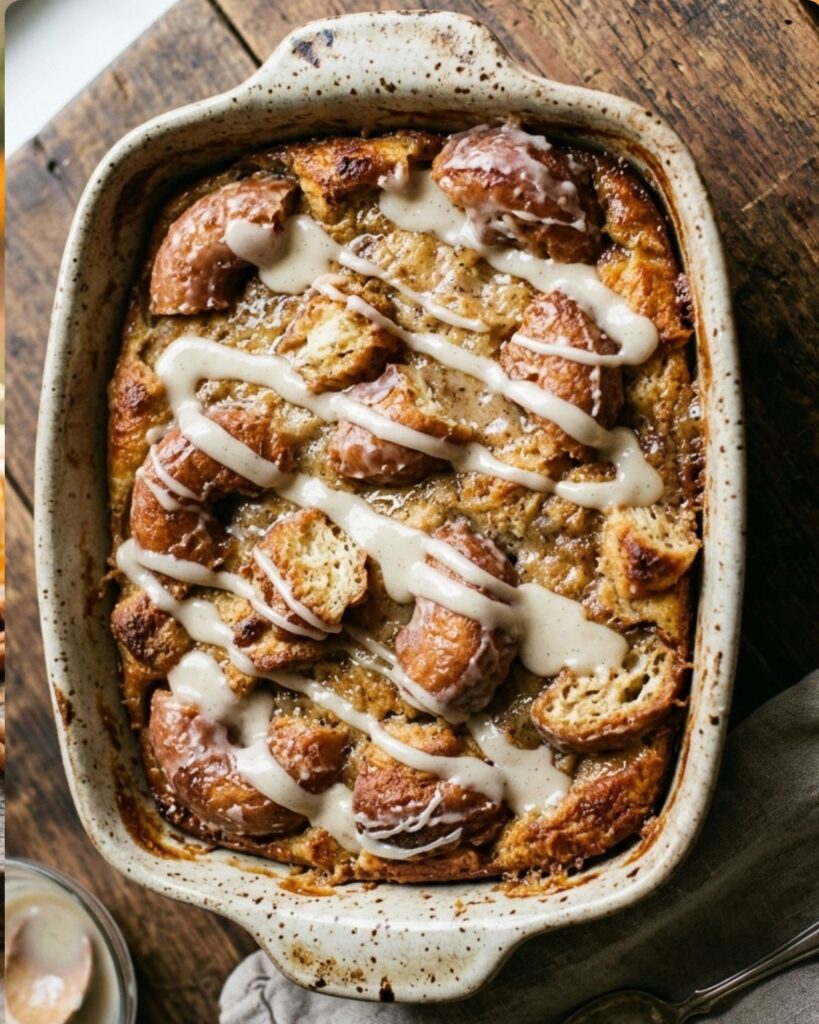
Fresh apples, warm cinnamon, and soft baked bread always bring a cozy feeling to my kitchen. I began making this Apple Bread Pudding as a simple way to use up leftover bread, and it quickly became one of those recipes my family requests again and again. The combination of creamy custard, tender apples, and a golden, lightly crisp top makes every bite warm, comforting, and full of homemade flavor. Whether you’re serving it for a cozy weekend dessert, a holiday gathering, or a special family dinner, this easy Apple Bread Pudding recipe is sure to become a favorite in your home too. Why You’ll Love This Apple Bread Pudding Recipe Key Ingredients & Helpful Tips Bread Day-old bread is the best choice because it soaks up the custard without becoming soggy. Brioche, challah, or French bread all work wonderfully, but any sturdy bread will do. If you’re using fresh bread, toast the cubes in a 300°F oven for about 10 minutes to dry them out before mixing. Apples Choose firm apples like Honeycrisp, Granny Smith, Fuji, or Pink Lady for the best results. These varieties become tender while baking but still hold their shape, adding sweet, juicy bites throughout the pudding. Raisins Raisins are completely optional, but they add natural sweetness and a chewy texture that pairs beautifully with the soft custard. If raisins aren’t your favorite, simply leave them out or replace them with dried cranberries or chopped nuts. Milk Whole milk creates a smooth, creamy custard with plenty of richness. For an even more indulgent dessert, substitute half of the milk with heavy cream or half-and-half for a richer flavor and silkier texture. Brown Sugar Brown sugar gives this bread pudding its deep caramel-like sweetness and complements the apples and cinnamon perfectly. Light or dark brown sugar both work well, with dark brown sugar providing an even richer molasses flavor. How to Make Apple Bread Pudding Step 1: Prepare the Bread and Apples Cut the bread into bite-sized cubes and place them in a large mixing bowl. Peel, core, and dice the apples, then add them along with the raisins. Gently toss everything together so the apples are evenly distributed throughout the bread. Step 2: Make the Custard In a separate bowl, whisk together the milk, brown sugar, melted butter, eggs, cinnamon, and vanilla extract until the mixture is smooth and well combined. Step 3: Soak the Bread Pour the custard over the bread mixture, making sure every piece is coated. Gently press the bread into the liquid with a spoon, then let it rest for 10 minutes so it can fully absorb the custard. Step 4: Bake Until Golden Transfer the mixture to a greased 7×11-inch baking dish and spread it evenly. Bake at 350°F (175°C) for about 45 minutes, or until the top is golden brown and the center is just set. Step 5: Prepare the Vanilla Sauce While the bread pudding is baking, combine the milk, butter, white sugar, and brown sugar in a small saucepan over medium heat. Stir until the butter melts and the sugar dissolves. Simmer for 2–3 minutes until slightly thickened, then remove from the heat and stir in the vanilla extract. Step 6: Serve and Enjoy Drizzle the warm vanilla sauce over the freshly baked apple bread pudding and serve while it’s warm. Add a scoop of vanilla ice cream or a dollop of whipped cream for an extra-special dessert, if desired. Pro Tips for the Best Apple Bread Pudding Start with Stale Bread Using slightly stale bread is the secret to a perfectly custardy bread pudding. Fresh bread tends to become soggy, while day-old bread absorbs the custard evenly and holds its shape. Cut the Apples Evenly Dice the apples into small, even pieces or thin slices so they bake at the same rate. This ensures every bite is tender without any crunchy pieces. Let the Bread Soak After pouring the custard over the bread, let it rest for 10–15 minutes. This simple step allows the bread to fully absorb the liquid, resulting in a rich, creamy texture. Bake Until Just Set The pudding is done when the top is golden brown and the center is just set. Avoid overbaking, as it can dry out the custard and make the pudding less creamy. Cover If Needed If the top starts browning too quickly, loosely cover the baking dish with aluminum foil for part of the baking time. Remove the foil during the last 15–20 minutes to help the top turn perfectly golden. Serve with Warm Vanilla Sauce For the best flavor and texture, prepare the vanilla sauce just before serving. Warm sauce soaks into the bread pudding beautifully, making every bite extra rich and delicious. Easy Ways to Customize Your Apple Bread Pudding Try More Recipe Frequently Asked Questions Final Thoughts Apple Bread Pudding is one of those comforting desserts I never get tired of making. I love how simple, everyday ingredients come together to create a warm, cozy treat that’s perfect for sharing with family and friends. The creamy custard, tender apples, and warm cinnamon flavors make every bite feel comforting and homemade.I hope this recipe earns a place in your kitchen just like it has in mine. If you make it, I’d love to hear what you think! Leave a comment below and let me know how it turned out, or share your favorite variation.