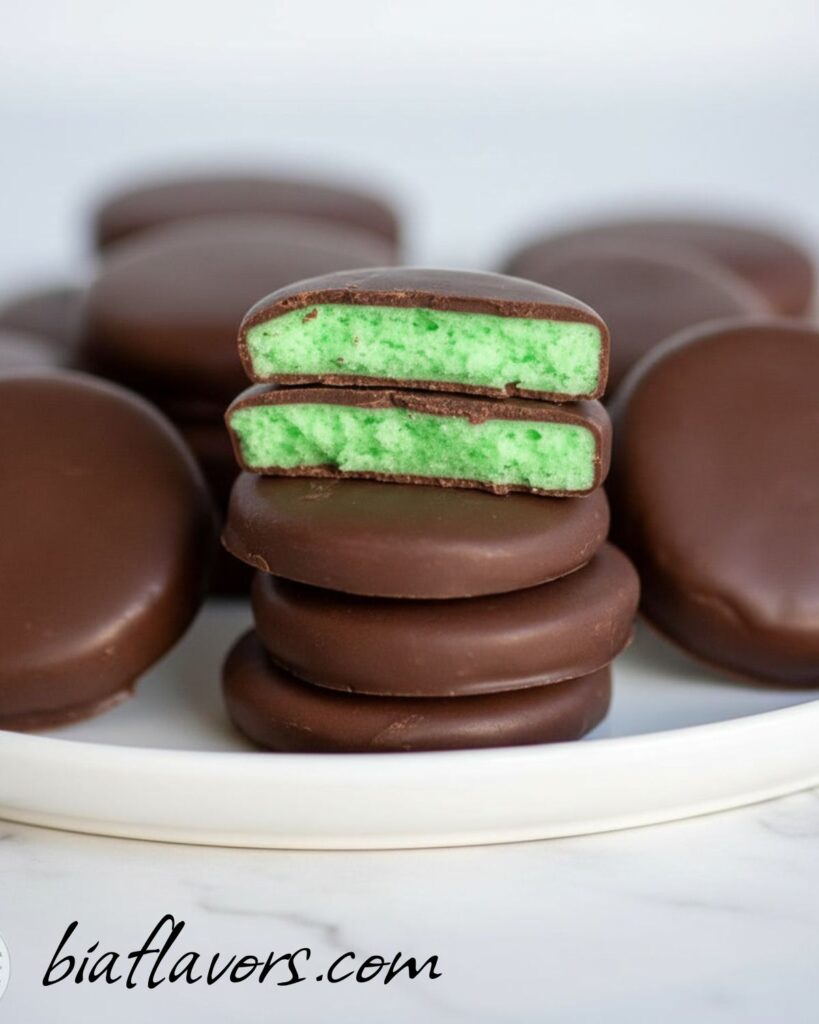
These chocolate mint patties are cool, creamy, and coated in a smooth layer of rich chocolate, giving you that perfect melt-in-your-mouth contrast between refreshing mint and deep cocoa flavor. Each bite feels like a little homemade candy shop treat simple, elegant, and surprisingly easy to make.
When I first tried making these, I wanted something that felt like classic chocolate mints you get in gift boxes, but fresher and more homemade. After a few tries adjusting the texture of the filling, I finally got that perfect balance soft, creamy centers that hold their shape and a chocolate coating that snaps slightly when you bite into it.
They’re no-bake, quick to prepare, and perfect for holidays, gifting, or keeping in the fridge for a refreshing sweet bite anytime.
Why You’ll Love These Chocolate Mint Patties
These chocolate mint patties are smooth, creamy, and perfectly balanced with a cool mint center wrapped in a rich chocolate coating. Every bite melts in your mouth, giving you that refreshing mint-chocolate combination that feels both indulgent and refreshing.
They’re also incredibly easy to make since they are no-bake and require simple ingredients. Whether you’re preparing them for holidays, gifting, or just keeping a sweet treat in the fridge, they always feel special, homemade, and delicious.
Ingredients for Chocolate Mint Patties
Mint Filling Base
- ⅓ cup light corn syrup – gives smooth texture and helps bind the mixture
- 5 tbsp unsalted butter, softened – adds richness and creamy texture
- 1½ tsp mint extract – provides cool, refreshing mint flavor
- ½ tsp salt – balances sweetness and enhances flavor
- Green gel food coloring – gives classic mint patty color (add gradually)
- 4 to 5 cups powdered sugar – sweetens and helps form a firm, moldable dough
Chocolate Coating
- 10 oz chocolate candy coating (melting wafers, almond bark, or candiquik)
How to Make Chocolate Mint Patties
Prepare the mint mixture
Start by adding the light corn syrup, softened butter, mint extract, salt, and green food coloring into a mixing bowl. Stir everything together until the mixture becomes smooth and well combined. At this stage, the base should look creamy and evenly colored, forming the foundation of your mint filling.
Add powdered sugar gradually
Begin adding the powdered sugar one cup at a time, mixing after each addition. As you continue, the mixture will start to thicken. Once it becomes too stiff to stir with a spoon, switch to mixing with your hands. Keep adding powdered sugar until the dough is no longer sticky and feels soft but firm enough to hold its shape.
Shape and chill the dough
Place the dough between two sheets of parchment paper and roll it out evenly. Chill it in the refrigerator for about 60–90 minutes until it becomes firm. This step is important because it makes the dough easier to cut and helps the patties hold their shape when dipped in chocolate.
Cut into patties
Once chilled and firm, use a small round cutter to cut out mint discs. If you prefer, you can also roll the dough into small balls and gently flatten them into round patties. Place them on a lined tray and keep them chilled until ready to coat.
Melt the chocolate coating
Melt the chocolate candy coating according to package instructions until smooth and glossy. Make sure it is fully melted so it coats the patties evenly without clumping.
Dip the patties
Using a fork or dipping tool, dip each mint patty into the melted chocolate. Let the excess chocolate drip off before placing them back onto parchment paper. Work carefully so each piece gets a smooth, even coating.
Set and store
Allow the chocolate to set completely at room temperature or place them in the fridge to speed up the process. Once firm, store the patties in an airtight container. They can be kept chilled for a refreshing, melt-in-your-mouth treat anytime.

Expert Tips for Perfect Chocolate Mint Patties
Get the dough consistency right
The mint dough should be soft but not sticky. If it sticks to your hands, add a little more powdered sugar. If it feels too dry or crumbly, a tiny bit more corn syrup can help bring it back together.
Chill properly for clean shapes
Don’t rush the chilling step. At least 60–90 minutes helps the dough firm up so you can cut neat circles and dip them easily without losing shape.
Roll evenly for uniform patties
When rolling the dough, keep the thickness even. This ensures all patties set properly and look uniform after coating.
Work with cold patties
Keep cut patties chilled until you’re ready to dip them. Warm patties can soften and break when dipped into chocolate.
Melt chocolate smoothly
Use low heat and stir often while melting the chocolate coating. Overheating can make it thick or grainy, which affects the smooth finish.
Tap off excess chocolate
After dipping, gently tap the fork to remove extra chocolate. This helps create a thin, even coating and prevents messy bottoms.
Personal tip
These taste even better after sitting overnight the mint flavor becomes smoother, and the chocolate shell develops a perfect crisp bite.
Common Mistakes to Avoid
Adding too much powdered sugar at once
If you add all the powdered sugar too quickly, the dough can become dry and hard to mix. Always add it gradually so you can control the texture and stop when the dough is soft but firm.
Not kneading enough
If the dough isn’t kneaded properly at the end, it may stay sticky or uneven. Kneading helps bring everything together into a smooth, moldable consistency.
Skipping or shortening chilling time
If you don’t chill the dough long enough, it will be too soft to cut clean patties and may lose shape when dipping into chocolate.
Cutting before dough is firm
Trying to cut or shape warm dough leads to messy edges and uneven patties. Always wait until it is fully chilled and firm.
Overheating chocolate
Chocolate that is overheated can become thick, grainy, or hard to work with. Melt it slowly for a smooth, glossy coating.
Dipping warm patties
If the patties are not cold enough, they can break apart or melt slightly when dipped. Always keep them chilled until the very last moment.
Skipping parchment paper
Without parchment paper, the patties may stick after dipping and lose their smooth finish. It also makes cleanup much easier.
Storage Tips
In the refrigerator
Store chocolate mint patties in an airtight container in the fridge for up to 2–3 weeks. Keep them layered with parchment paper so they don’t stick together and the chocolate coating stays smooth.
At room temperature
You can keep them at room temperature for about 2–3 days if your kitchen is cool. However, since they contain butter, they stay fresher and firmer in the fridge.
Freezing option
These patties freeze very well for up to 2 months. Place them in a single layer first to firm up, then transfer to a freezer-safe container. Thaw in the fridge before serving for best texture.
Best texture tip
For the perfect bite, serve them slightly chilled. The chocolate will be firm and snappy, while the mint center stays soft and creamy.
Make-ahead tip
You can prepare the mint filling ahead of time and refrigerate it for 1–2 days before shaping and dipping. This makes holiday or party prep much easier.
Serving Suggestions
Chilled and refreshing
Serve chocolate mint patties straight from the fridge for the best experience. The cool mint center and firm chocolate shell create a refreshing, melt-in-your-mouth bite.
After-meal sweet
These patties work perfectly as a light after-dinner treat. Their minty flavor feels refreshing and helps balance out a heavy meal.
Dessert platter addition
Add them to a dessert tray with cookies, brownies, or fudge. Their glossy chocolate coating makes them stand out beautifully on any sweets platter.
Holiday gifting
Pack them in small boxes or jars for gifting. They look elegant and homemade, making them perfect for Christmas or special occasions.
With hot drinks
Pair them with coffee, hot chocolate, or tea. The warmth of the drink contrasts nicely with the cool mint filling.
Frozen treat style
Enjoy them slightly frozen for a firmer bite and an ice-cream-like texture especially great in warm weather.
More Chocolate Recipes
FAQs About Chocolate Mint Patties
Why is my mint dough too sticky?
This usually happens when there isn’t enough powdered sugar. Keep adding it gradually until the dough becomes soft but no longer sticks to your hands. Also make sure you knead it well so everything comes together evenly.
Why is my dough too dry or cracking?
If the dough feels crumbly, it likely has too much powdered sugar. You can fix it by adding a tiny amount of corn syrup or kneading it longer to bring back moisture and softness.
Can I skip food coloring?
Yes, the food coloring is completely optional. It only gives the classic green mint look, but the flavor will remain the same without it.
Why is my chocolate coating not smooth?
Chocolate can become thick or grainy if overheated or if water gets into it. Melt it slowly on low heat and stir gently for a smooth, glossy finish.
Can I use peppermint extract instead of mint extract?
Yes, peppermint extract works well, but it is stronger in flavor. Start with a small amount and adjust carefully so the mint doesn’t become overpowering.
How do I keep patties from sticking together?
Always store them with parchment paper between layers. This prevents sticking and keeps the chocolate coating clean and smooth.
Final Thoughts
These chocolate mint patties are cool, creamy, and coated in a rich chocolate shell that gives you the perfect balance of refreshing mint and sweet chocolate. They’re simple to make, no-bake, and feel like a classic homemade candy treat.
Perfect for holidays, gifting, or keeping in the fridge for a refreshing sweet bite anytime, they’re a recipe you’ll want to make again and again.

Chocolate Mint Patties
Ingredients
- ⅓ cup light corn syrup
- 5 tbsp unsalted butter softened
- 1½ tsp mint extract
- ½ tsp salt
- Green gel food coloring as needed
- 4 to 5 cups powdered sugar
- 10 oz chocolate candy coating melting wafers / almond bark / Candiquik
Instructions
- Add powdered sugar gradually until dough forms.
- Knead until dough is soft but not sticky.
- Roll between parchment and chill for 60–90 minutes.
- Cut into rounds or shape into patties.
- Melt chocolate coating until smooth.
- Dip patties in chocolate and place on parchment paper.
- Let set completely until chocolate is firm.