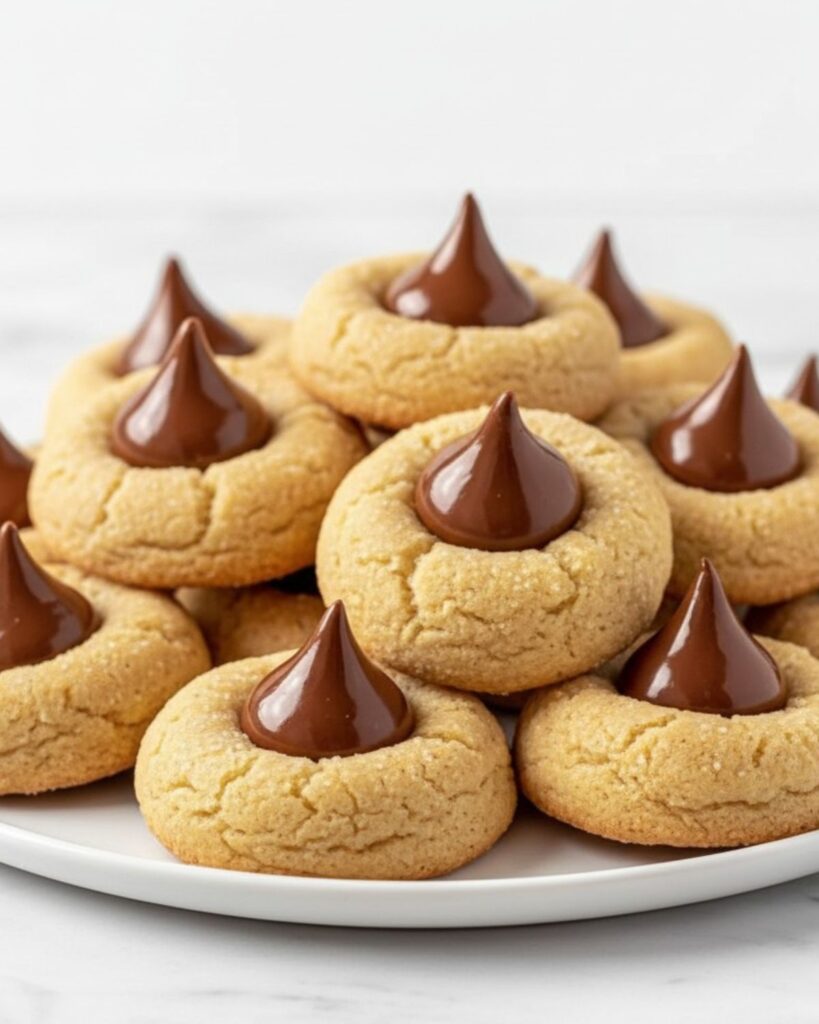
Author name: Areeba

Lemon crinkle cookies
Cookies

Lemon Crinkle Cookies – Soft, Chewy Cookies with Fresh Lemon Flavor

The first time I made Lemon Crinkle Cookies, I honestly expected them to taste overly sweet with just a little lemon flavor hiding in the background. But the moment I took the first bite, I understood why people love them so much. The outside had that delicate powdered sugar crinkle, while the inside stayed soft, chewy, and packed with fresh lemon flavor that actually tasted bright instead of artificial. What surprised me most was how simple they were to make. No complicated steps, no fancy techniques just a few small details that completely change the texture and flavor. Now they’ve become one of those cookies I make whenever I want something light, fresh, and different from heavy chocolate desserts. Why We Love Lemon Crinkle Cookies Lemon Crinkle Cookies have this really nice balance that’s hard to find in most homemade cookies. They’re soft and chewy like a classic bakery cookie, but the fresh lemon flavor makes them feel lighter and more refreshing instead of overly rich. One of my favorite things about them is the texture contrast. The outside develops that beautiful crinkled powdered sugar coating, while the center stays soft and tender with a slightly melt-in-your-mouth feel. They’re also the kind of cookies that work for almost any season. In summer, the citrus flavor feels fresh and bright, and during colder months, they bring something different when everything else is heavy chocolate desserts. Another reason people love them is how simple they look while still feeling special. You don’t need frosting, decorations, or complicated filling the crackled sugar coating already gives them that pretty bakery-style appearance naturally. Ingredients You’ll Need for Lemon Crinkle Cookies For the Lemon Cookies For the Coating How to Make Lemon Crinkle Cookies (Step-by-Step) Step 1: Mix the dry ingredients Start by whisking together the flour, baking soda, and salt in a medium bowl. Mixing these separately first helps everything distribute evenly throughout the dough, so the cookies bake properly without uneven texture. Step 2: Combine butter and sugar In a large bowl, mix the melted butter and granulated sugar until well combined. The mixture should look smooth and glossy. Using melted butter helps create that soft and chewy texture instead of a cakey cookie. Step 3: Add the wet ingredients Add the egg, fresh lemon juice, lemon zest, and vanilla extract to the butter mixture. Stir until everything is fully combined. At this stage, the dough starts smelling incredibly fresh and citrusy honestly one of the best parts of making these cookies. Step 4: Add dry ingredients carefully Slowly add the dry ingredients into the wet mixture and stir until just combined. Try not to overmix here because too much mixing can make the cookies dense instead of soft. The dough will look slightly sticky and softer than regular cookie dough, which is completely normal. Step 5: Chill the dough Cover the bowl and refrigerate the dough for at least 3–4 hours, or overnight if possible. This step is really important because the dough is too soft to bake immediately. Chilling also helps the lemon flavor deepen and gives the cookies a better texture. Step 6: Prepare for baking Preheat your oven to 350°F (180°C) and line baking sheets with parchment paper. Scoop about one tablespoon of dough and gently roll it into balls. First roll each dough ball in granulated sugar, then coat generously in powdered sugar. That double coating is what creates the beautiful crinkle effect while baking. Step 7: Bake the cookies Place the cookie dough balls on the baking sheet about 3 inches apart because they spread while baking. Bake for 9–13 minutes until the cookies have spread and developed cracks on top. The centers should still look slightly soft when you remove them they’ll continue setting as they cool. Step 8: Cool before serving Let the cookies rest on the baking sheet for about 3–5 minutes before transferring them to a wire rack. As they cool, the outside develops that delicate sugary coating while the inside stays soft, chewy, and full of bright lemon flavor. Expert Tips for Perfect Lemon Crinkle Cookies After making Lemon Crinkle Cookies a few times, I realized the biggest difference between average cookies and bakery-style ones comes from a few small details. None of them are difficult, but they really change the final texture and appearance. Use fresh lemons, not bottled juice Fresh lemon juice and zest make a huge difference here. Bottled lemon juice can taste flat or slightly artificial, while fresh lemons give the cookies that bright, natural citrus flavor that makes them stand out. Coat generously in powdered sugar A light coating won’t give you those pretty white cracks. I like rolling the dough balls heavily in powdered sugar so the crinkle effect stays visible after baking. Slightly underbake for softer cookies The cookies should still look a little soft in the center when you remove them from the oven. They continue baking on the tray as they cool, which keeps the inside chewy instead of dry. Zest only the yellow part of the lemon Avoid grating the white layer underneath (the pith), because it can add bitterness to the cookies. Just the bright yellow outer skin gives the best lemon flavor. Use parchment paper for even baking Parchment paper helps the cookies bake more evenly and prevents the bottoms from browning too quickly. Let cookies cool before storing If stored while still warm, condensation can soften the powdered sugar coating. I always let them cool completely first so the outside stays light and slightly crisp. How to Store Lemon Crinkle Cookies One thing I really like about Lemon Crinkle Cookies is that they stay soft for several days when stored properly. The lemon flavor actually becomes even better after a few hours because everything settles together nicely. Store at room temperature The best everyday method is keeping them in an airtight container at room temperature. They stay fresh and chewy for about 5–7 days. I usually place a piece

Chocolate Chip Cheesecake Cookies cheesecake stuffed chocolate chip cookie cut in half showing golden dough shell and white cheesecake filling layers
Cookies

Chocolate Chip Cheesecake Cookies – Soft, Creamy & Bakery Style Treat

I still remember the first time I tried a cookie that had a cheesecake filling inside. It wasn’t from a bakery or cafe it was something I randomly saw online and thought, And honestly, my first batch was a bit messy filling leaked, cookies spread too much, and I almost gave up halfway. But the taste? That was the moment I got hooked. Soft cookie on the outside, creamy cheesecake surprise inside it felt like two desserts in one bite. After a few tries in my kitchen, I finally figured out how to get that perfect balance where cookies stay soft, filling stays creamy, and nothing falls apart. Now it’s one of those recipes I make when I want something comforting but a little special at the same time. Why We Love Chocolate Chip Cheesecake Cookies There’s something really comforting about these cookies that’s hard to explain until you actually bite into one. On the outside, they look like classic chocolate chip cookies, but the inside completely surprises you with that creamy cheesecake center. That contrast is what makes them special soft, slightly chewy cookie with melty chocolate chips on the outside, and a rich, smooth filling inside that almost melts in your mouth. Another reason they’re so loved is how satisfying they feel without being overly heavy. I’ve made plenty of desserts that taste good but feel too rich after a few bites. These cookies hit a nice balance where you can easily have more than one without feeling overwhelmed. They also give that “bakery-style” experience at home. When you cut one open and see the creamy center, it instantly feels like something you’d buy from a fancy dessert shop. And honestly, they just make people happy whether it’s friends, family, or even just a quiet evening snack with coffee or milk. Ingredients You’ll Need for Chocolate Chip Cheesecake Cookies For the Cheesecake Filling For the Cookie Dough How to Make Chocolate Chip Cheesecake Cookies (Step-by-Step) Step 1: Prepare the cheesecake filling Start by mixing the softened cream cheese, powdered sugar, and vanilla extract in a bowl until the texture becomes smooth and creamy. This filling should feel soft but slightly thick, not runny. Once ready, cover it and place it in the fridge. Chilling helps it firm up, which makes stuffing the cookies much easier later. Step 2: Make the cookie dough base In a large bowl, cream together the softened butter, brown sugar, and granulated sugar until the mixture looks light and fluffy. This step is important because it creates that soft, bakery-style texture in the cookies. Then add the eggs one at a time, mixing well after each addition. Pour in the vanilla extract and mix again until everything looks smooth and combined. Step 3: Mix dry ingredients In a separate bowl, whisk together the flour, baking soda, baking powder, and salt. This helps distribute everything evenly so the cookies bake properly without uneven texture. Now slowly add the dry mixture into the wet ingredients. Mix just until combined — don’t overmix, or the cookies can turn dense instead of soft. Step 4: Add chocolate chips Gently fold in the chocolate chips using a spatula. Make sure they are evenly spread throughout the dough so every bite has that chocolatey goodness. At this stage, the dough should feel soft, slightly thick, and easy to handle. Step 5: Shape the cookies with cheesecake filling Take about 2 tablespoons of cookie dough and flatten it in your hand. Place a small spoon of chilled cheesecake filling in the center. Then take another small piece of dough and cover the filling completely. Seal the edges carefully so the filling doesn’t leak during baking. Repeat this process for all cookies. Step 6: Bake the cookies Preheat your oven to 350°F (175°C) and line a baking tray with parchment paper. Place the stuffed cookies on the tray, leaving space between them because they will spread slightly. Bake for 12–14 minutes or until the edges look lightly golden and the center still looks slightly soft. That soft center is what keeps them gooey inside. Step 7: Cool and enjoy Let the cookies rest on the baking tray for a few minutes before moving them to a wire rack. This helps them set properly and prevents breaking. Once cooled, the cheesecake center becomes creamy and rich, making every bite soft, chocolatey, and slightly tangy in the best way. Expert Tips for Perfect Chocolate Chip Cheesecake Cookies After making these cookies a few times, I realized they’re not difficult but they are sensitive to small details. Once you understand those little things, the results become consistently bakery-style. Keep the cheesecake filling chilled This is something I learned after my first messy batch. If the filling is too soft, it becomes difficult to wrap inside the dough and can leak while baking. A slightly firm, chilled filling holds its shape much better and stays neatly inside the cookie. Don’t overwork the cookie dough When you mix flour into the wet ingredients, stop as soon as everything comes together. Overmixing makes the cookies dense instead of soft and chewy. I used to keep mixing thinking it would improve texture, but it actually made them heavier. Seal the dough properly around the filling This is one of the most important steps. If there are tiny gaps in the dough, the cheesecake filling will escape in the oven. I always press the edges gently and double-check before baking. Slightly underbake for soft centers The cookies should look a little soft in the middle when you take them out. They continue to bake on the tray after removal. This keeps them gooey inside instead of dry and firm. Use room temperature ingredients Butter and eggs at room temperature blend more smoothly, giving a more even cookie dough. Cold ingredients can make the mixture uneven and affect texture. Chill dough if it feels too soft If your dough becomes sticky or hard to handle, a short chill in the

Soft Chocolate Swiss Roll with whipped cream filling and chocolate ganache topping
Cake, Desserts

Chocolate Swiss Roll – Bakery Style Soft & Creamy Cake Roll

I still remember the first time I tried making a Chocolate Swiss Roll at home. It looked so simple when I saw it online a thin chocolate sponge, rolled up neatly with cream inside. But the reality? My first attempt cracked badly the moment I tried to roll it. That moment honestly taught me something: Swiss roll isn’t difficult, it’s just very sensitive. Timing matters more than effort. After a few tries (and a couple of messy kitchen disasters), I finally figured out how to get that soft, flexible sponge that rolls beautifully without breaking. And now it’s one of my favorite quick desserts to make when I want something impressive but not complicated. Let’s break it down the way I wish someone had explained it to me in the beginning. Why You’ll Love This Chocolate Swiss Roll There’s something special about Swiss roll that always feels a bit “bakery-level,” even though it’s made with simple ingredients. The sponge is light and airy, not heavy like regular cake. And when you bite into it, you get that soft chocolate layer with smooth cream filling that melts instantly. What I personally love is how customizable it is. You can make it extra creamy, lightly sweet, or even add fruits like strawberries or bananas if you want to switch things up. Also, it chills beautifully meaning the next day it tastes even better. Ingredients You’ll Need for Chocolate Swiss Roll For Chocolate Cake Sponge For Whipped Cream Filling For Chocolate Ganache Topping How to Make Chocolate Swiss Roll (Step-by-Step) Step 1: Prepare your baking pan Start by preheating your oven to 350°F (180°C). Line a 17×12-inch jelly roll pan with parchment paper, making sure the paper slightly hangs over the edges. This little detail makes it so much easier to lift the cake out later without breaking it. Step 2: Mix dry ingredients In a bowl, combine flour, cocoa powder, baking powder, espresso powder, and salt. Mix everything well so the cocoa and leavening agents are evenly distributed. This helps the sponge bake evenly and prevents any dry or bitter spots in the cake. Step 3: Whip eggs and sugar In a separate large bowl, beat the eggs, sugar, and vanilla extract on high speed until the mixture becomes pale, thick, and fluffy. This step is really important because it adds air to the batter, which is what makes the sponge soft and flexible enough to roll later. Step 4: Combine dry ingredients gently Now add the dry ingredients into the whipped egg mixture in two parts. Gently fold everything together using a spatula instead of mixing hard. The goal is to keep the air inside the batter so the sponge stays light and doesn’t turn dense. Step 5: Add warm milk and butter Heat the milk and butter together until the butter melts and the mixture is hot. Slowly pour it into the batter and gently mix until smooth. This adds moisture and richness, giving the sponge that soft, bakery-style texture. Step 6: Bake the sponge Spread the batter evenly into the prepared pan and bake for about 10–12 minutes. The cake is ready when it springs back lightly when touched and a toothpick comes out clean. Be careful not to overbake, or it will dry out and crack while rolling. Step 7: Roll while it’s hot As soon as the cake comes out of the oven, lift it out using the parchment paper. While it’s still warm, gently roll it up from the shorter side with the parchment inside. Let it cool in this rolled shape so it holds its form and doesn’t crack later. Step 8: Fill and re-roll Once the cake has completely cooled, carefully unroll it. Spread the whipped cream filling evenly across the surface, leaving a small border around the edges. Then gently roll it back up without parchment paper and wrap it in plastic before chilling. Step 9: Add chocolate ganache Heat the cream and pour it over chopped chocolate. Let it sit for a few minutes, then stir until smooth and glossy. Pour the ganache over the chilled cake roll and spread it evenly. Let it set before slicing for clean, beautiful pieces. Expert Tips for Perfect Chocolate Swiss Roll After making this Chocolate Swiss Roll a few times, I realized it’s not really a “hard” recipe it’s a timing game. Small kitchen habits make a huge difference between a clean roll and a cracked one. These are the tips I personally wish I followed from the beginning. Pay attention to egg whipping stage Don’t rush the eggs and sugar step. When they turn pale, thick, and fluffy, that’s your foundation for a soft sponge. If this step is underdone, the cake will feel dense and won’t roll easily later. Keep your folding technique gentle Once flour goes in, think “soft folding,” not mixing. I used to be too aggressive here and ended up losing all the air I worked hard to create. A light hand keeps the sponge airy and flexible. Don’t rely on baking color This is a big one. The cake might still look slightly soft or pale when it’s done and that’s actually perfect. If you wait for it to look “fully baked brown,” you’ll probably overbake it and risk cracks. Roll immediately, not after cooling The sponge must be rolled while it’s still warm. I learned this the hard way. If you wait too long, it sets flat and becomes stiff, which almost guarantees cracking when you try to roll it later. Avoid thick sponge layers Make sure you spread the batter evenly and thinly in the pan. A thick sponge might look nice, but it’s much harder to roll cleanly and usually breaks at the center. Chill before slicing Once assembled, don’t rush slicing. Letting the roll chill helps everything set properly. The cream firms up, the flavors blend, and you get those clean bakery-style slices instead of messy ones. How to Store Chocolate Swiss Roll Refrigeration

“Bakery-style red velvet cake roll dusted with powdered sugar and cream filling”
Cake, Desserts

Red Velvet Cake Roll

The first time I tried making a red velvet cake roll, I honestly thought I had ruined it before it even left the pan. I remember pulling the cake out of the oven, feeling weirdly confident because it looked soft and perfect. Then came the rolling part. One small crack turned into three giant ones, the filling leaked everywhere, and my “beautiful bakery-style dessert” looked more like a collapsed towel. What surprised me later was that cake rolls are actually not hard they’re just unforgiving if you rush them. After making this recipe multiple times (including one stressful attempt before a family dinner), I finally figured out the small details that actually matter. Things like rolling the cake while hot, not overmixing the batter, and even re-rolling it during cooling completely changed the result. If you’ve ever wanted to make a soft, creamy, bakery-style red velvet cake roll at home without the usual disasters, this guide will save you a lot of frustration. And yes this version stays soft, rolls beautifully, and tastes even better the next day. Why You’ll Love This Red Velvet Cake Roll I’ve baked plenty of desserts that looked impressive but tasted average. This isn’t one of them. The I love layered cakes, but sometimes they feel like too much work. Frosting layers evenly, smoothing the sides, decorating the top it can quickly turn into a stressful project. That’s why I started appreciating cake rolls more. This dessert gives you that fancy bakery-style look without requiring expert decorating skills. Once sliced, the spiral filling instantly makes it look elegant. The texture is also completely different from regular red velvet cake. Instead of dense layers with thick frosting, this version is light, soft, and creamy. The sponge stays fluffy while the cream cheese whipped filling adds richness without becoming overly sweet. The best part is that it tastes even better after chilling for a few hours. The flavors settle together beautifully, and the cake becomes softer the next day. Ingredients You’ll Need For Red Velvet Cake Roll For the Red Velvet Cake For the Cream Cheese Whipped Filling The Biggest Mistake People Make With Cake Rolls I used to think cake rolls cracked because the sponge was too dry. While overbaking definitely causes problems, I later realized the real issue was cooling the cake incorrectly. The first few times, I waited for the cake to cool completely before rolling it because I thought touching it while hot would destroy it. That was exactly the problem. Cake rolls need to be shaped while warm so the sponge “learns” the rolled shape before setting. Once I started rolling the cake immediately after baking, the cracks became much smaller or disappeared completely. It honestly surprised me how much difference that one step made. How to Make Red Velvet Cake Roll (Step-by-Step) Step 1: Prepare the Pan and Oven Preheat oven to 350°F (175°C). Line a 17×12-inch jelly roll pan with parchment paper, leaving slight overhang on the sides for easy removal. Proper preparation ensures the sponge releases easily and rolls without breaking. Step 2: Mix Dry Ingredients In a bowl, whisk together flour, cocoa powder, baking powder, and salt. This step helps distribute cocoa evenly and prevents lumps in the batter, which keeps the sponge smooth and consistent. Step 3: Prepare the Wet Batter In a separate bowl, whisk egg yolks and sugar until smooth. Add buttermilk, oil, vanilla, vinegar, and red food coloring. Mix until the batter becomes glossy and evenly colored. Gently fold in the dry ingredients until just combined avoid overmixing to keep the sponge light. Step 4: Whip Egg Whites In a clean bowl, beat egg whites until stiff peaks form. This step is essential because it adds air and structure to the sponge, making it flexible enough to roll without cracking. Fold the whipped egg whites gently into the batter in batches to maintain airiness. Step 5: Bake the Cake Spread the batter evenly into the prepared pan. Tap lightly to remove air bubbles. Bake for 10–12 minutes, or until the cake springs back when lightly touched. Do not overbake, as a dry sponge will crack when rolled. Step 6: Roll While Warm Once baked, immediately lift the cake using parchment paper. Roll it gently from the shorter side while still warm. This step is crucial it sets the shape and prevents cracking later. Let it cool in the rolled position. Step 7: Make the Cream Filling Whip cold heavy cream, powdered sugar, and vanilla until slightly thickened. Add softened cream cheese and continue whipping until smooth, thick, and pipeable. The filling should be light yet stable enough to hold shape inside the roll. Step 8: Assemble the Cake Roll Carefully unroll the cooled sponge. Spread an even layer of cream filling, leaving a small border around edges. Roll the cake back slowly and gently without pressing too hard. Wrap in plastic wrap and chill for at least 1 hour. Slice and Serve the Red Velvet Cake Roll Before serving, dust the top lightly with powdered sugar for a simple bakery-style finish. Use a sharp serrated knife for slicing and wipe the blade clean between cuts if you want neat spiral slices. The final texture should feel soft & creamy. And the flavor has that perfect balance of cocoa, vanilla, and cream cheese richness without becoming overly sweet. The first time I sliced a clean spiral after struggling through earlier attempts, it honestly felt incredibly satisfying. Common Mistakes to Avoid When Making Red Velvet Cake Roll When I first started making cake rolls, I thought the recipe itself was the problem. But after a few tries, I realized most failures come from small mistakes that seem harmless in the moment. The funny part is, every mistake I made felt small until I saw the cake crack or the filling leak everywhere. Once I understood these issues, my results improved a lot. If you’re trying this recipe for the first time, avoiding these mistakes will

Double Chocolate Sandwich Cookies
Cookies

Double Chocolate Sandwich Cookies

The first time I made Double Chocolate Sandwich Cookies, I expected them to be messy and overly sweet. Instead, they turned out soft, rich, and surprisingly bakery-style right from my kitchen. The cookies stay chewy in the center with slightly crisp edges, while the creamy chocolate filling makes every bite taste extra indulgent. After a few test batches, I realized the secret is not overbaking the cookies and letting the filling chill before assembling. If you love rich chocolate desserts that actually taste homemade in the best way possible, these Double Chocolate Sandwich Cookies are definitely worth making. Why You’ll Love These Double Chocolate Sandwich Cookies These Double Chocolate Sandwich Cookies are the kind of dessert that disappears fast once they hit the table. The cookies are soft, chewy, and packed with rich chocolate flavor, while the creamy filling makes them taste like something from a bakery. One thing I really love about this recipe is that the cookies stay soft even the next day. They’re rich without being overly sweet, and the chocolate flavor actually tastes deep and fudgy instead of artificial. They also look impressive without requiring complicated decorating skills. Once sandwiched together with the creamy filling, they instantly feel like a special homemade treat perfect for parties, holidays, or late-night chocolate cravings. Ingredients You’ll Need for Double Chocolate Sandwich Cookies For the Chocolate Cookies For the Chocolate Frosting Filling How to Make Double Chocolate Sandwich Cookies (Step-by-Step) Making these cookies at home honestly feels easier than it looks. When I first tried them, I expected a complicated bakery-style process, but it’s actually a simple mix, bake, and fill situation. The real magic happens when the warm chocolate cookies meet that creamy frosting filling. Let’s go step by step so you can get that soft, chewy, bakery-style result without stress. Step 1: Prep Your Oven and Baking Tray Start by preheating your oven to 375°F (190°C). Line a baking sheet with parchment paper so the cookies don’t stick and bake evenly. I always recommend doing this first because once the dough is ready, you don’t want to wait around. Fresh dough gives better texture when baked immediately. Step 2: Make the Cookie Dough In a mixing bowl, cream together softened butter and sugar just until combined. Don’t overmix here you’re not whipping air into it, just blending. Add the egg and milk, and mix again until smooth. In a separate bowl, combine flour, cocoa powder, and baking powder, then slowly add it into the wet mixture. At this stage, the dough should look soft, slightly sticky, and deeply chocolatey. That’s exactly what you want for chewy cookies later. Step 3: Shape and Bake the Cookies Drop spoonfuls (about a tablespoon each) of dough onto your baking tray, leaving space between them because they will spread slightly. Bake for 6–8 minutes only. This part is important don’t overbake. The cookies might look slightly soft in the center when you take them out, but they will firm up as they cool. Let them rest on the tray for 2–3 minutes before moving them to a cooling rack. Step 4: Make the Chocolate Frosting Filling In a bowl, beat together butter and shortening until smooth and creamy. Add half of the powdered sugar and cocoa powder, mixing until combined. Then add vanilla extract and a little water, and continue mixing. Slowly add the remaining powdered sugar until you get a thick, pipeable frosting. Adjust with a little water if it feels too stiff. The filling should be creamy but firm enough to hold shape between cookies. Step 5: Assemble the Sandwich Cookies Step 6: Let Them Set Let the cookies sit for 15–20 minutes so the filling settles slightly. This makes them easier to handle and improves texture when biting in. Honestly, this is the hardest part because they smell so good you’ll want to eat them immediately. Expert Tips for Perfect Double Chocolate Sandwich Cookies After making these Double Chocolate Sandwich Cookies a few times, I realized something simple small details change everything. The recipe itself is easy, but the difference between “good cookies” and “bakery-style cookies” comes down to how you handle the dough, baking time, and filling. Here are the tips I wish I knew from the start. Don’t overmix the dough When you combine the wet and dry ingredients, mix just until everything comes together. I made the mistake of mixing too long once, and the cookies turned out slightly dense instead of soft and chewy. A light mix keeps the texture tender and prevents the cookies from becoming tough. Bake them slightly underdone This is honestly the biggest game-changer. The cookies should look a little soft in the center when you take them out of the oven. Don’t wait for them to turn hard in the oven. They continue to set while cooling, and this is what keeps them soft even after sandwiching. Let cookies cool completely before filling I know it’s tempting to rush this part, but if you add frosting to warm cookies, the filling will melt and slide out. I usually wait until the cookies are fully cooled to room temperature before assembling. It makes a huge difference in clean, bakery-style sandwiches. Adjust frosting consistency carefully The filling should be thick but smooth enough to pipe. If it’s too runny, it will ooze out. If it’s too stiff, it won’t spread properly. Add water very slowly even a teaspoon at a time makes a big difference. Use same-sized cookies for better sandwiches Try to pair cookies of similar size before assembling. It sounds small, but uneven cookies make the sandwiches look messy and harder to handle. I usually match them before starting the filling step so everything goes smoothly. Chill for better texture (optional but worth it) If you have time, let the assembled cookies sit in the fridge for 20–30 minutes. The filling firms up slightly, and the flavors blend together beautifully. Personally, I think they taste even better after a

blueberry muffins
Muffins

Easy Blueberry Muffins

The first time I made blueberry muffins, every single blueberry sank straight to the bottom. The top was plain, the bottom was purple mush. I had no idea what went wrong but that one failed batch taught me the most important trick in this recipe. If you’ve ever had muffins that looked beautiful in the photos but came out flat, dry, or weirdly dense you’re not alone. I’ve been there too. Blueberry muffins seem simple, but there are a few small things that make a huge difference between an average muffin and one that actually tastes like it came from a proper bakery. This recipe is the one I keep coming back to. After testing it several times in my own kitchen, adjusting the flour ratio, trying both fresh and frozen blueberries, and figuring out the oven temperature issue I was having, I finally landed on a version that works every single time. I’m going to walk you through exactly how I make these including the mistakes I made so you don’t have to repeat them. Why These Blueberry Muffins Actually Work A lot of blueberry muffin recipes online give you the same basic instructions. But they skip the reasons behind each step and those reasons are exactly why your muffins either turn out great or don’t. These muffins are soft because of the right butter-to-flour ratio. They’re fluffy because we don’t overmix. The blueberries stay evenly spread (instead of sinking) because of one simple trick I’ll show you in the steps. And the tops get that golden bakery-style dome because of how full you fill the cups and the oven temperature we use. Once you understand why each step matters, you’ll never second-guess yourself in the kitchen again. Ingredients You’ll Need For Blueberry Muffins Topping Note: I’ve tested both fresh and straight-from-frozen blueberries in this recipe. Honestly, frozen ones (not thawed!) actually performed better in my tests they didn’t bleed purple into the batter the way fresh ones do when it’s warm in the kitchen. Either works, but if your fresh blueberries are soft and juicy, go frozen. How to Make Blueberry Muffins (Step by Step) Preheat Your Oven to 400°F (200°C) This higher temperature is intentional. Starting at 400°F creates a burst of heat that makes the tops rise quickly and form that domed bakery shape. Some recipes use 350°F but that gives you flat, sad muffin tops. Trust the heat on this one. Line your 12-cup muffin pan with paper liners now, before you start mixing anything. Mix Your Dry Ingredients First In a medium bowl, whisk together the flour, baking powder, and salt. This takes 30 seconds but it matters it distributes the baking powder evenly so every muffin rises at the same rate. Set this bowl aside. We’ll come back to it. Coat the Blueberries in Flour — Don’t Skip This Take about a tablespoon of your dry flour mixture and toss the blueberries in it until lightly coated. This is the trick I wish someone had told me the first time. The flour creates a light barrier that keeps the berries suspended in the batter instead of sinking to the bottom. I skipped this step my first time. Every blueberry ended up in a purple blob at the base of each muffin. Never again. Beat the Wet Ingredients Together In a large bowl, beat the sugar, melted butter, and eggs together for about 2 minutes until the mixture looks smooth and slightly lighter in color. Then mix in the vanilla extract. Make sure your eggs and milk are at room temperature cold eggs added to melted butter can make it seize up into little lumps. If you forgot to take them out early, just sit the eggs in warm water for 5 minutes. Combine Wet and Dry (Gently) Add the dry ingredients to the wet mixture in 3 parts, alternating with the milk. Mix gently after each addition just until the flour disappears. You want to see the batter just come together. This is where most people go wrong. Overmixing develops gluten and turns your muffins tough and rubbery. Put the electric mixer down and use a spatula for this step. A few small lumps in the batter? Totally fine. Fold in the Blueberries Add your flour-coated blueberries and fold them in gently with a spatula. Don’t stir aggressively we want the berries intact, not smashed. Three or four slow folds is all you need. Fill the Cups Almost to the Top Divide the batter evenly among the 12 cups. Fill each one nearly to the top don’t do the usual “two-thirds full” rule here. These muffins need to be filled generously to get that tall, domed bakery top. Add a few extra blueberries on top of each one and sprinkle with coarse sugar. That little crunch on top makes such a difference. Bake for 20 Minutes Bake at 400°F for about 20 minutes. You’re looking for golden-brown tops and a toothpick that comes out with just a few moist crumbs not wet batter, but not completely dry either. Every oven is a little different. Start checking at 18 minutes. The moment the tops look golden and feel set when you lightly press them, they’re done. Let them cool in the pan for 5 minutes, then move to a wire rack. They taste incredible slightly warm the blueberries get extra juicy as they cool down just a little. Expert Tips for Perfect Blueberry Muffins Every Time These are the things I figured out through trial and error small details that genuinely make a difference. Measure Flour the Right Way Scooping flour directly from the bag packs it down and gives you 20–30% more flour than you need. Spoon the flour into your measuring cup and level it off. Better yet, use a kitchen scale 240g is 240g no matter what. Don’t Overmix I can’t say this enough. Once the flour goes in, the spatula replaces the mixer. Stir just enough that you can’t see dry

slice of caramel apple pie showing gooey apple and caramel layers
Pie Recipes

Caramel Apple Pie

This Caramel Apple Pie is one of those desserts that instantly feels warm, cozy, and comforting. With soft, cinnamon-spiced apples and a rich caramel sauce tucked inside a flaky crust, every bite is sweet, buttery, and full of flavor. I made this when I wanted something classic but a little more special than regular apple pie. Adding caramel takes it to another level it melts into the apples as it bakes, creating a soft, gooey filling that’s hard to resist. It’s the kind of pie that fills your kitchen with an amazing aroma and feels perfect for holidays, gatherings, or anytime you want a truly homemade dessert. Why We Love This Caramel Apple Pie We love this pie because it combines everything you want in a dessert flaky crust, tender apples, warm spices, and rich caramel all in one bite. The balance of sweet and slightly tangy apples with buttery caramel makes it incredibly satisfying. It’s also a great upgrade from classic apple pie. The caramel adds extra depth and richness, making it feel more indulgent while still keeping that homemade, comforting vibe. Another reason we love it is how comforting and crowd-pleasing it is. It’s the kind of dessert that brings everyone to the table, whether it’s for a holiday dinner, a family gathering, or just a cozy weekend bake. Ingredients for Caramel Apple Pie Crust: Caramel Sauce: Apple Filling: How to Make Caramel Apple Pie Make the crust Start by combining flour and salt in a food processor or bowl. Add cold cubed butter and mix until the texture becomes crumbly with small pea-sized butter pieces. Slowly add ice water, one tablespoon at a time, until the dough starts to come together. Divide into two discs, wrap in plastic, and refrigerate for at least 1 hour so the dough becomes firm and easier to roll. Prepare the caramel sauce In a saucepan, combine sugar and water and heat until dissolved. Add butter and bring to a boil without stirring so the caramel doesn’t crystallize. Let it cook until it turns a deep golden color. Remove from heat and slowly add heavy cream while whisking carefully. Add vanilla and salt, then set aside 1/2 cup for drizzling later. Stir flour into the remaining caramel so it thickens slightly as it cools. Make the apple filling Peel, core, and slice apples evenly so they cook properly. Toss them with lemon juice to keep them fresh. Mix apples with sugars, flour, salt, and vanilla. Cook them in a covered pan until they become tender but still hold their shape. Once done, cool completely in the fridge so the filling sets and doesn’t make the pie soggy. Assemble the pie Roll out one pie crust and place it into a 9-inch pie dish. Add a layer of apple filling, then drizzle caramel sauce on top. Repeat layers until filling is used, finishing with caramel. Add the top crust (lattice or full cover). Brush with beaten egg and sprinkle coarse sugar on top. Chill the assembled pie for 20–30 minutes before baking. Bake the pie Bake at 425°F (220°C) for 15 minutes, then reduce heat to 350°F (175°C) and bake for 50–60 minutes until golden and bubbling. Let the pie cool completely for 3–4 hours before slicing so the filling sets properly. Expert Tips for Perfect Caramel Apple Pie Common Mistakes to Avoid Storage Tips Serving Suggestions More Pie Recipes FAQs About Caramel Apple Pie Can I make caramel apple pie ahead of time?Yes, this pie is perfect for making ahead. You can prepare it a day in advance and store it at room temperature (if cool) or in the fridge. In fact, resting overnight helps the flavors blend together and makes slicing easier. Why is my apple pie filling watery?This usually happens if the apples weren’t cooked enough or if the pie wasn’t cooled properly before slicing. Make sure the filling is thickened while cooking and always allow the pie to cool completely so it sets. Can I skip cooking the apples before baking?You can, but pre-cooking is highly recommended. It ensures the apples are tender and evenly cooked. If you skip this step, you risk undercooked or uneven fruit texture. What apples work best for this recipe?A mix of Granny Smith and Honeycrisp works best. Granny Smith adds tartness and structure, while Honeycrisp adds sweetness and juiciness for a balanced flavor. How do I prevent a soggy bottom crust?Make sure the apple filling is cooled before adding it to the crust. Also, baking the pie on a preheated baking sheet helps the bottom crust cook evenly and stay crisp. Can I freeze caramel apple pie?Yes, you can freeze it either whole or in slices. Wrap it tightly in plastic wrap and foil, then store in a freezer-safe container for up to 2 months. Thaw in the fridge before serving. Why did my crust shrink while baking?This usually happens if the dough wasn’t chilled long enough before baking. Always chill the crust before assembling and baking to help it hold its shape. Final Thoughts This Caramel Apple Pie is the kind of dessert that feels like home the moment it comes out of the oven. The flaky crust, tender spiced apples, and rich caramel come together in a way that feels simple but still really special. What makes it stand out is that balance sweet, slightly tangy, buttery, and warm all at once. It’s not just about the flavor, but also that cozy feeling you get when you slice into it and see all those layers holding together perfectly. It does take a bit of time, but honestly, that’s what makes it worth it. This is one of those recipes you make for family gatherings, holidays, or whenever you want a dessert that feels homemade in the best way possible.

Reese’s marshmallow brownies with gooey chocolate and peanut butter layers
Bars & Brownies

Reese’s Marshmallow Brownies

These Reese’s Marshmallow Brownies are the kind of dessert that instantly grabs attention the moment you see them. With a fudgy chocolate brownie base, a soft layer of melted marshmallows, and chunks of Reese’s on top, every bite is rich, gooey, and packed with chocolate peanut butter flavor. I first made these when I wanted something a little more fun than regular brownies, and honestly, they turned out even better than expected. The combination of warm chocolate, sticky marshmallow, and creamy peanut butter just works so well together. They’re indulgent, slightly messy in the best way, and perfect for when you want a dessert that feels extra special without too much effort. Why We Love These Reese’s Marshmallow Brownies We love these brownies because they combine three amazing things chocolate, marshmallow, and peanut butter into one irresistible dessert. The base is soft and fudgy, the marshmallow layer adds that gooey stretch, and the Reese’s pieces bring a rich, creamy bite. They’re easy to make, perfect for sharing, and always a hit at gatherings. Plus, they look impressive without requiring any complicated steps, which makes them a go-to recipe when you want something quick but memorable. Ingredients for Reese’s Marshmallow Brownies Chocolate Crunch Topping: How to Make Reese’s Marshmallow Brownies Bake the brownies Start by preparing the brownie mix according to the package instructions using a 9×13 baking dish. Mix the batter until smooth, making sure there are no dry pockets. Pour it into the prepared pan and spread evenly so it bakes uniformly. Once baked, let the brownies cool completely at room temperature—this step is important so the layers don’t melt later. After cooling, place the pan in the refrigerator for at least 1 hour so the brownies become firm and easy to layer. Add marshmallow layer Take the chilled brownies out of the fridge and spread the marshmallow fluff evenly over the top. Since it can be sticky, use a spatula and work gently to spread it without pulling up the brownie layer. Try to cover the entire surface so every bite gets that soft, gooey texture. Once done, return it to the fridge for about 30 minutes so the marshmallow layer sets slightly and becomes easier to handle. Add Reese’s layer Now place the halved Reese’s miniatures on top of the marshmallow layer. Arrange them evenly across the surface so each slice gets a good amount of peanut butter chocolate. Press them down lightly so they stick into the marshmallow and don’t move when you add the next layer. Make chocolate topping In a microwave-safe bowl, combine the chocolate chips and peanut butter. Heat in 30-second intervals, stirring in between each round until the mixture becomes smooth and fully melted. Take your time here to avoid burning the chocolate. Once smooth, add the crispy rice cereal and gently mix until all the cereal is coated in the chocolate mixture. Assemble and chill Carefully spoon the chocolate cereal mixture over the Reese’s layer. Use a spatula to spread it evenly, but work gently so you don’t disturb the layers underneath. Once the top is evenly covered, place the pan back in the refrigerator for about 1 hour, or until everything is fully set and firm to touch. Slice and serve Once chilled, remove the brownies from the fridge and let them sit for about 5–10 minutes to soften slightly. This makes slicing easier and cleaner. Use a sharp knife to cut into bars, wiping the knife between cuts for neat edges. Now they’re ready to serve rich, gooey, and packed with chocolate peanut butter goodness. Expert Tips for Perfect Reese’s Marshmallow Brownies Common Mistakes to Avoid Storage Tips Serving Suggestions More Brownie Recipes FAQs About Reese’s Marshmallow Brownies Can I make these brownies ahead of time?Yes, and they’re actually a great make-ahead dessert. You can prepare them a day in advance and keep them in the refrigerator. This gives all the layers time to set properly, making them easier to cut and even better in texture. Just take them out a few minutes before serving so they’re not too firm. Why is my marshmallow layer messy or hard to spread?Marshmallow fluff is naturally sticky, so it can be tricky to spread. Try using a spatula and working slowly, or lightly grease the spatula to help it glide smoothly. Also, make sure your brownies are fully chilled this makes spreading much easier. Can I use regular marshmallows instead of fluff?Yes, you can use mini marshmallows as a substitute. Just sprinkle them evenly over the brownies and briefly warm them in the oven until they soften, then gently spread. Keep in mind the texture will be slightly different but still delicious. How do I get clean, neat slices?For the best results, chill the brownies until firm before cutting. Use a sharp knife and wipe it clean between each cut. Letting the brownies sit at room temperature for a few minutes also helps prevent cracking. Can I use crunchy peanut butter?Yes, you can use crunchy peanut butter if you like extra texture. It will add a slight crunch to the topping, which some people really enjoy. Why are my layers not setting properly?This usually happens if the brownies weren’t chilled long enough or if the chocolate topping didn’t cool completely. Give each layer enough time to set in the fridge, especially the final step, to get firm, structured bars. Final Thoughts These Reese’s Marshmallow Brownies are one of those desserts that feel fun, indulgent, and just a little over the top in the best way. You’ve got that rich fudgy brownie base, the soft gooey marshmallow layer, and then that crunchy chocolate peanut butter topping that brings everything together. What I really like about this recipe is how it turns simple ingredients into something that looks and tastes like a proper treat. It’s not complicated, but the layers make it feel special enough for parties, gatherings, or even just when you’re craving something extra chocolatey. If you try it once, there’s

Carrot Cake Bars with Cream Cheese Frosting
Bars & Brownies

Carrot Cake Bars with Cream Cheese Frosting

These carrot cake bars with cream cheese frosting are soft, moist, and warmly spiced with cinnamon in every bite. Freshly grated carrots add natural sweetness and keep the texture tender, while the spices make the whole kitchen smell like a cozy bakery while they bake. When I first started testing carrot desserts, I struggled a bit with getting the texture right some batches turned out too dry, and others felt too dense. After a few tries and small adjustments, this version finally came out perfect: soft, fluffy bars with just the right amount of moisture and a creamy frosting that ties everything together beautifully. They’re simple to make, slice neatly, and feel like a comforting homemade treat that I keep coming back to, especially when I want something cozy, nostalgic, and a little special for sharing. Why You’ll Love These Carrot Cake Bars These carrot cake bars are soft, moist, and perfectly spiced with warm cinnamon flavor in every bite. The grated carrots keep them naturally tender and add a gentle sweetness that makes the bars rich but not heavy. They’re also easy to make in one pan, which means less effort but still a bakery-style result. Topped with smooth cream cheese frosting, they turn into a cozy, comforting dessert that feels perfect for holidays, tea time, or sharing with family and friends. Ingredients for Carrot Cake Bars with Cream Cheese Frosting Mix-ins (Carrot Cake Flavor) Cream Cheese Frosting How to Make Carrot Cake Bars Prepare the pan Start by preheating your oven to 350°F (175°C) so it’s fully ready when your batter is mixed. Lightly grease a 10×15-inch jelly roll pan or line it with parchment paper. This step is important because carrot cake bars are moist, and proper lining ensures they come out clean without sticking or breaking. Mix wet ingredients In a large mixing bowl, whisk together the applesauce (or oil), granulated sugar, and eggs until the mixture becomes smooth and slightly creamy. This wet base is what keeps the bars soft and tender, and the eggs help give structure so the cake holds together after baking. Add dry ingredients Add the flour, baking soda, baking powder, salt, and cinnamon into the wet mixture and stir gently just until combined. Be careful not to overmix, as this can make the bars dense instead of light and fluffy. The cinnamon will immediately start giving a warm, cozy aroma. Add carrots and mix-ins Fold in the grated carrots, shredded coconut, chopped nuts, vanilla extract, and crushed pineapple (with juice). This step adds natural sweetness, moisture, and texture. The pineapple keeps the bars extra soft while the carrots and coconut give that classic homemade carrot cake feel. Bake the bars Pour the batter into your prepared pan and spread it evenly so it bakes uniformly. Bake for 25–30 minutes, or until a toothpick inserted in the center comes out clean. Avoid overbaking because it can dry out the bars. Once done, let them cool completely before frosting so the cream cheese topping stays smooth and firm. Make the Cream Cheese Frosting Beat butter and cream cheese In a mixing bowl, beat the softened butter and cream cheese together until they become light, fluffy, and completely smooth. This creates the creamy base for the frosting and ensures there are no lumps for a bakery-style finish. Add sweetness and flavor Gradually add the powdered sugar and vanilla extract, beating until the frosting becomes thick, creamy, and spreadable. This step balances the tanginess of the cream cheese with sweetness, creating a rich and smooth topping. Assemble & Serve Frost the cooled bars Once the carrot cake bars are completely cooled, spread the cream cheese frosting evenly over the top. Take your time here for a smooth, even layer that looks clean and bakery-perfect. Slice and enjoy Cut into neat bars using a sharp knife for clean edges. These bars taste even better after chilling for a little while, as the frosting sets and the flavors fully develop into a rich, moist, and perfectly spiced dessert. Expert Tips for Perfect Carrot Cake Bars Use finely grated carrots Grate the carrots as finely as possible so they blend smoothly into the batter. Large shreds can make the texture uneven and slightly chunky instead of soft and tender. Don’t skip the pineapple juice Use the crushed pineapple with its juice, not drained. This adds natural moisture and keeps the bars soft, preventing them from turning dry. Mix gently for a soft texture Once you add the dry ingredients, stir only until combined. Overmixing develops gluten and can make the bars dense instead of light and fluffy. Let the bars cool completely Always wait until the bars are fully cooled before adding frosting. If they are even slightly warm, the cream cheese frosting can melt and lose its smooth finish. Chill before slicing For cleaner, bakery-style squares, chill the frosted bars for 30–60 minutes before cutting. This helps the frosting set and gives sharp, neat edges. Customize the add-ins You can adjust coconut or nuts based on preference, but don’t overload the batter. Too many mix-ins can affect the structure and baking time. Personal tip These bars taste even better the next day the spices deepen, and the frosting settles beautifully into the soft carrot cake layer. Common Mistakes to Avoid Overmixing the batter Mixing too much after adding flour can make the bars dense and heavy instead of soft and fluffy. Stir only until the ingredients are just combined for the best texture. Using coarse carrots If the carrots are not finely grated, they won’t blend properly into the batter. This can create uneven texture and make the bars feel stringy instead of moist and tender. Draining the pineapple Skipping the juice from the crushed pineapple is a big mistake. The juice adds essential moisture that keeps the bars soft and helps balance the spices. Overbaking Leaving the bars in the oven too long can dry them out. Always check at the minimum baking time—when

Flourless brownies with rich fudgy texture and crackly top
Bars & Brownies

Flourless Brownies

These flourless brownies are rich, fudgy, and intensely chocolatey with a dense, melt-in-your-mouth texture that feels almost like a chocolate truffle in brownie form. Since there’s no flour in the recipe, the chocolate flavor becomes even deeper and more pronounced, making every bite extra indulgent. I tested this recipe carefully to get the right balance because flourless baking can easily turn too soft or too dense. After adjusting the ratio of chocolate, butter, and eggs, the brownies came out perfectly smooth in the center with a slightly crisp top and a rich, gooey texture inside. They’re simple, naturally gluten-free, and come together quickly with just a few ingredients, making them perfect for last-minute desserts, dinner parties, or serious chocolate cravings. Why You’ll Love These Flourless Brownies These flourless brownies are ultra fudgy, rich, and deeply chocolatey with a dense, melt-in-your-mouth texture that feels almost like a chocolate truffle. Without any flour, the chocolate flavor becomes more intense and pure, making them a dream dessert for true chocolate lovers. They’re also naturally gluten-free and made with simple pantry ingredients, so you don’t need anything complicated to get bakery-style results. Whether you’re baking for guests or treating yourself, these brownies always feel indulgent, elegant, and incredibly satisfying. Ingredients You’ll Need for Flourless Brownies Chocolate Base Sweeteners & Flavor Eggs & Structure Dry Ingredients (Flourless Structure) Optional Add-in How to Make Flourless Brownies Prepare the pan Preheat your oven to 350°F (175°C) so it reaches the right temperature for even baking. Lightly grease an 8-inch square pan and line it with parchment paper, leaving some overhang on the sides. This step is important because flourless brownies are very fudgy, and parchment helps you lift them out cleanly without breaking. Melt chocolate and butter In a large microwave-safe bowl, combine the chocolate chips and butter. Melt them in short 30-second intervals, stirring each time until the mixture becomes smooth and glossy. This forms the rich chocolate base of the brownies and ensures a deep, fudgy texture. Add sugar and vanilla Stir in the granulated sugar and vanilla extract until fully combined. The mixture will start to thicken slightly and look shiny. This step not only sweetens the brownies but also helps create that classic crackly top once baked. Add eggs Add the eggs one at a time, mixing well after each addition. This helps build structure in place of flour and gives the brownies their dense, chewy texture. Make sure each egg is fully incorporated before adding the next for a smooth batter. Mix dry ingredients In a separate bowl, whisk together the cocoa powder, cornstarch, and salt until well combined. This flourless blend is what gives the brownies structure while keeping them soft and fudgy instead of cakey. Combine everything Add the dry ingredients into the chocolate mixture and stir vigorously for 1–2 minutes. The batter will become thick, smooth, and slightly pull away from the sides of the bowl when ready. If using, gently fold in the toffee bits for extra crunch and flavor. Bake the brownies Pour the batter into the prepared pan and spread it evenly with a spatula. Bake for 33–37 minutes, or until the edges are set and a toothpick inserted in the center comes out with a few moist crumbs. This ensures a rich, fudgy center. Cool and slice Allow the brownies to cool completely in the pan before removing. Since they are very soft when warm, cooling helps them set properly. Once cooled, lift them out using the parchment paper and cut into neat, clean squares for the perfect bakery-style finish. Expert Tips for Perfect Flourless Brownies Use good-quality chocolate Since chocolate is the main ingredient, its quality really matters. Use a good semi-sweet chocolate (like Ghirardelli) for a richer, deeper flavor and smoother texture. Don’t overbake Flourless brownies are meant to be fudgy, not dry. Remove them when a toothpick shows a few moist crumbs this ensures a soft, truffle-like center. Mix the batter well After adding the dry ingredients, stir vigorously for 1–2 minutes. This helps the cornstarch fully combine and gives the brownies their dense, glossy texture. Room temperature eggs are important Cold eggs can cause the chocolate mixture to seize or become uneven. Room temperature eggs blend smoothly and help create a silky batter. Let them cool completely These brownies need time to set. Cutting them too early can make them fall apart, so always cool fully for clean, neat slices. Add mix-ins carefully If using toffee bits or extras, fold them in gently at the end. Too many add-ins can break the smooth, fudgy structure. Personal tip These brownies actually taste even better the next day. After resting overnight, the chocolate flavor becomes deeper and the texture turns even more fudgy and rich. Common Mistakes to Avoid Overbaking the brownies One of the biggest mistakes is baking too long. Flourless brownies should stay fudgy, so remove them as soon as the center has a few moist crumbs. Overbaking will make them dry and dense instead of soft and rich. Not melting chocolate properly If the chocolate and butter aren’t fully melted and smooth, the batter can turn grainy. Always melt slowly in short intervals and stir well for a silky base. Using cold eggs Cold eggs don’t blend well with warm chocolate and can cause the mixture to become uneven. Always use room temperature eggs for a smooth, glossy batter. Skipping proper mixing After adding dry ingredients, the batter needs to be mixed thoroughly until thick and glossy. Under-mixing can leave a slightly gritty texture. Cutting too early These brownies are very soft when warm. If you cut them before they fully cool, they may fall apart and lose their clean edges. Incorrect measuring of ingredients Too much cocoa powder or cornstarch can make brownies dry or rubbery. Always measure carefully for the best fudgy texture. Not lining the pan properly Skipping parchment paper can make it difficult to remove the brownies. Always line the pan so you can lift

Hi, I’m Bia! I share my favorite recipes, tips, and kitchen hacks to make every meal memorable and delicious.

Recent Posts

  • All Posts
  • Bars & Brownies
  • Bread
  • Breakfast
  • Brownies
  • Cake
  • Cheesecakes
  • Cookies
  • Cupcake
  • Desserts
  • Muffins
  • Pie Recipes
  • Pound Cake
  • Recipes
  • Trifles

Contact Us

© 2026 Created with Bia Flavors 

Hi, I’m Bia! I share my favorite recipes, tips, and kitchen hacks to make every meal memorable and delicious.

Recent Posts

  • All Posts
  • Bars & Brownies
  • Bread
  • Breakfast
  • Brownies
  • Cake
  • Cheesecakes
  • Cookies
  • Cupcake
  • Desserts
  • Muffins
  • Pie Recipes
  • Pound Cake
  • Recipes
  • Trifles

Contact Us

©  2026 Created with Bia Flavors 

Hi, I’m Bia! I share my favorite recipes, tips, and kitchen hacks to make every meal memorable and delicious.

Scroll to Top